Thanks, Grandma! Perfect Puffy Pancakes!

These puffy pancakes will charm anyone — kids, guests, your in-laws, even yourself! I love making these and my kids are always happy when I do. Try them — they’re easier than you think and everyone will be happy!

Image

Apple Soufflé Pancake

I’ve liked this puffy pancake since my grandmother made one pretty similar to mine,. satisfying my appreciation for eggs and fruit together.And because I usually always have eggs and apples around, this easy-to-make dish is a familiar one at our dinner table—and shows up for other meals, as well.

Serves 4

3 large eggs

1/2 cup milk

2 tablespoons sugar

2 tablespoons all-purpose flour

Pinch of salt

2 tablespoons unsalted butter

2 apples, peeled and thinly sliced, such as Gala, Rome or Honey Crisp

1/2 teaspoon ground cinnamon, optional

Maple syrup, for serving

Preheat the oven to 400°F.

Whisk the eggs with the milk and 1 tablespoon of the sugar. Whisk in the flour and salt until smooth.

Melt the butter in an oven-safe skillet over medium heat and when it begins to bubble, add the apples and cook for 2 to 3 minutes, tossing very gently. Sprinkle the remaining tablespoon of sugar and the cinnamon, if using, over the apples and cook for 2 to 3 minutes longer or until tender.

Pour the batter into the skillet and transfer it to the oven. Bake for 10 to12 minutes or until the mixture sets and puffs slightly. Serve hot from the oven, sprinkled with more cinnamon, if desired, and with maple syrup.

Ginger Cake for Fall Days

I put this cake on Facebook and Twitter earlier in the month, but why not showcase it again? It’s that good — and is about as perfect as any dessert can be when the days grow shorter….and the weather is cooler…and we crave something that tastes of fall. Here you go!!

Image

Fresh Ginger Cake

This ordinary-looking cake is deceptive, packed as it is with powerful flavors, particularly the punch of fresh ginger. I bake it all year long, although I particularly like it in the fall when it fills the kitchen with warm, sensual aromas that say “autumn.” And in case you’re wondering about the difference between this and more typical gingerbread, this cake’s ginger and spice quotients are much higher.

Serves 10

6 ounces fresh ginger, peeled

1 cup granulated sugar

1 cup dark black-strap molasses

1 cup canola oil

2 teaspoons baking soda

21/2 cups all-purpose flour

1/2 teaspoon ground cinnamon

1/2 teaspoon ground cloves

2 large eggs, lightly beaten

About 1/2 teaspoon fresh lemon juice

1/4 cup confectioners’ sugar

Preheat the oven to 325°F. Grease a 9-inch round pan that is 3 inches deep and line it with a parchment paper circle cut to fit.

Cut the ginger into medium-size pieces and put in the bowl of a food processor. Add the granulated sugar and pulse until very smooth, like a paste. Mix together the molasses and canola oil.

In a saucepan, bring 1 cup of water to a boil over medium-high heat, add the baking soda, and when dissolved, stir in the molasses mixture.

Whisk together the flour, cinnamon, and cloves and then whisk into the molasses mixture until combined. Add the eggs and mix well.

Pour the batter into the prepared pan and bake for 60 to 65 minutes, or until a toothpick inserted in the middle of the cake comes out dry.

Meanwhile, in a small bowl, drizzle the lemon juice, a few drops at a time, over the confectioners’ sugar, whisking until the glaze is thick and smooth. Set the glaze aside until needed.

Allow the cake to cool in the pan for 10 to15 minutes and then turn out of the pan to cool completely on a wire rack. When cool, drizzle the glaze over the top of the cake and serve.

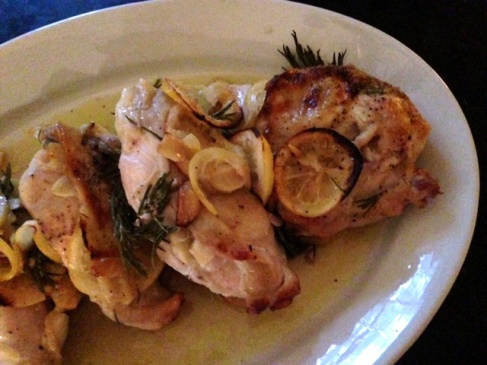
Chicken Breasts with Lemon and Rosemary! Sound Good? They Are Terrific!!

My family is always happy when chicken breasts are on the menu. Yours, too? And this lovely dish, flavored with lemon, garlic, and rosemary, is one of the best I know. Chicken breasts are nearly always on my shopping list and if not, that means they are probably in our freezer. Just waiting. Try these — everyone will be very happy!

Image

Lemon-Rosemary Chicken Breasts

When it comes to flavor, these chicken breasts are not shy. They literally are stuffed with lemon, garlic, and rosemary, and as they bake, they fill the kitchen with a heady fragrance. For serving, the only thing the breasts need is a good douse of extra-virgin olive oil.

Serves 4

4 split bone-in chicken breast halves with the skin

3 lemons, thinly sliced

12 garlic cloves, thinly sliced

8 sprigs fresh rosemary

3/4 cup olive oil

Kosher salt and freshly ground black pepper

Extra-virgin olive oil, for drizzling

Loosen the skin of each chicken breast by inserting your fingers between the skin and the meat. Slide 2 lemon slices, 1 whole clove of sliced garlic, and 1 sprig of rosemary under the skin of each breast.

Arrange the breasts in a shallow glass, ceramic, or other nonreactive dish and pour the oil over the chicken.

Remove the rosemary leaves from the remaining 4 sprigs of rosemary and scatter the rosemary leaves and remaining lemon and garlic slices over the chicken. Cover the dish and refrigerate for 6 to 8 hours or overnight.

Preheat the oven to 375°F.

Without removing the lemon slices on top of the chicken breasts, transfer the breasts to a clean baking pan. (The lemon slices are delicious once cooked, so you don’t want to  discard them before roasting.) Season lightly with salt and pepper and roast for 25 to 35 minutes, or until the chicken is cooked through. (The time will depend on the size of the breast: they will be 180°F at the thickest part.) Serve hot from the oven, drizzled with a little more olive oil.

About these ads

Occasionally, some of your visitors may s

Chicken Breasts with Lemon and Rosemary. Sound good?! It is!

My family is always happy when chicken breasts are on the menu. Yours, too? And this lovely dish, flavored with lemon, garlic, and rosemary, is one of the best I know. Chicken breasts are nearly always on my shopping list and if not, that means they are probably in our freezer. Just waiting. Try these — everyone will be very happy!

Image

Lemon-Rosemary Chicken Breasts

When it comes to flavor, these chicken breasts are not shy. They literally are stuffed with lemon, garlic, and rosemary, and as they bake, they fill the kitchen with a heady fragrance. For serving, the only thing the breasts need is a good douse of extra-virgin olive oil.

Serves 4

4 split bone-in chicken breast halves with the skin

3 lemons, thinly sliced

12 garlic cloves, thinly sliced

8 sprigs fresh rosemary

3/4 cup olive oil

Kosher salt and freshly ground black pepper

Extra-virgin olive oil, for drizzling

Loosen the skin of each chicken breast by inserting your fingers between the skin and the meat. Slide 2 lemon slices, 1 whole clove of sliced garlic, and 1 sprig of rosemary under the skin of each breast.

Arrange the breasts in a shallow glass, ceramic, or other nonreactive dish and pour the oil over the chicken.

Remove the rosemary leaves from the remaining 4 sprigs of rosemary and scatter the rosemary leaves and remaining lemon and garlic slices over the chicken. Cover the dish and refrigerate for 6 to 8 hours or overnight.

Preheat the oven to 375°F.

Without removing the lemon slices on top of the chicken breasts, transfer the breasts to a clean baking pan. (The lemon slices are delicious once cooked, so you don’t want to  discard them before roasting.) Season lightly with salt and pepper and roast for 25 to 35 minutes, or until the chicken is cooked through. (The time will depend on the size of the breast: they will be 180°F at the thickest part.) Serve hot from the oven, drizzled with a little more olive oil.

Pasta with Walnut Pesto. Yup. Walnut Pesto! So, so good!

Even before I married into a big Italian family I liked pasta. These days I pretty much LOVE pasta. Can’t get enough of it. Can you? I mean, who doesn’t smile at the thought of those soft, tender, just-chewy-enough noodles that act as host to so many glorious flavors and textures? Pasta can “go” with nearly anything, from tomatoes to meat to cheese to vegetables. This one is loaded with cheese, walnuts, peas, prosciutto, olive oil, butter, and parsley. Could it get any better?!
Image

Try it. No one will be disappointed.

Pasta with Walnut Ricotta Pesto

I find a lot of pasta dishes addictive and this one pretty much tops the list. It’s hard to let even a little bit remain clinging to the side of the pan. The first time I made this, I didn’t tell my family that there were walnuts in the sauce, fearing they would turn up their noses if they knew about them. They cleaned their plates and asked for seconds. We all love the slight crunch.

Serves 4 to 6

Walnut Pesto

11/2 cups walnut pieces, toasted

2 garlic cloves

1 cup ricotta cheese

1/4 cup grated Parmesan cheese

1/4 cup extra-virgin olive oil

1/4 cup chopped flat-leaf parsley

1 teaspoon kosher salt

Pasta

1 pound pasta, such as penne, farfalle, or orecchiette

2 tablespoons unsalted butter, softened

1 cup frozen peas, thawed

3 ounces prosciutto, very thinly sliced

Kosher salt and freshly ground black pepper

To make the pesto: In the bowl of a food processor, process the walnuts and garlic until finely ground. Scrape into a serving bowl and add the ricotta cheese, Parmesan cheese, olive oil, parsley, and salt. Mix well and set aside at room temperature.

To make the pasta: Cook the pasta according to package directions until al dente. Before draining, reserve about 1/4 cup of the pasta water. Add the pasta to the pesto and mix well. Mix the pasta water into the pasta if the pesto seems too thick, adding it a tablespoon at a time.

Gently toss in the butter, peas, and prosciutto. Season to taste with salt and pepper and serve right away.

Pumpkin Chili? You’ll Love It!

Just made this (from the book, Dinnertime Survival). As delicious as ever! and so "fall like." Enjoy it!

Image

Pumpkin Chili

This one took a while to get right but I am as pleased with this chili as a kid with a bulging bag of Halloween candy. When I say “pumpkin chili,” the expression on people’s faces is priceless because it sounds like an oddity—and yet it’s easy, healthful, and so delicious. A couple of years ago, my family and some friends went to a pumpkin festival in Pennsylvania Amish country. While we tried pumpkin bowling and football, we also ate all manner of foods made with pumpkin. Cold and hungry, we dug into some pumpkin chili and my taste memory is that it was about the best thing I had ever put in my mouth. I made many tries to get the recipe right and finally success is mine! Hope your family likes it as much as mine does.

Serves 6

4 tablespoons canola oil

1 pound ground beef

Kosher salt and freshly ground black pepper

1 medium onion, diced

1 green bell pepper, seeded and diced

3 garlic cloves, peeled and thinly sliced

1 zucchini, diced

1 cup peeled and diced butternut squash

1 (15-ounce) can plain, unseasoned pumpkin purée

2 cups canned crushed plum tomatoes and juices

2 cups chicken stock, preferably homemade

1 teaspoon pumpkin pie spice

1 teaspoon cumin

3/4 teaspoon chili powder

1 (15-ounce) can kidney beans, drained and rinsed

Heat 2 tablespoons of the oil over medium-high heat in a large sauté pan until shimmering. Cook the beef, breaking it up with a wooden spoon, until browned and cooked through and it is in small pieces. Add about 11/2 teaspoons of salt and season to taste with pepper. Drain the meat and set aside.

In the same pan, heat the remaining 2 tablespoons of oil over medium-high heat (if you use the same pan, wipe it clean). When hot, cook the onion, green pepper, and garlic for 5 to 6 minutes or until the vegetables are tender.

Return the meat to the pan along with the zucchini, squash, pumpkin purée, tomatoes, stock, pumpkin pie spice, cumin, chili powder, and about 11/2 teaspoons of salt. Bring to a boil, reduce the heat, cover, and cook at a gentle simmer for about 30 minutes or until the butternut squash is tender. Adjust the heat to maintain the simmer.

Add the kidney beans, stir the chili well, heat through, and serve.

Beef Stew? You Bet!

I’ve been cooking a lot of vegetarian dishes lately — and loving them! I’ve always been partial to vegetables, but have not crossed over to the other side…yet. Beef stew is one of the major roadblocks on the road to becoming a hardcore vegetarian because, well, because it’s so darn good! Who can resist a rich, warm, aromatic, full-flavored beef stew on a blustery fall or winter evening? Not me!

beef stew

Easy Beef Stew

I wanted to come up with a recipe for beef stew that wasn’t intimidating, although when you look at the long list of ingredients you might be tempted to turn the page. Please don’t! Once you assemble the stew meat and vegetables, the rest is easy. The stew cooks for about an hour and then it’s ready. If you make it the day ahead and reheat it before serving, it’s even better — and even easier

Serves 4

2 pounds beef stew meat, such as top round or chuck

Kosher salt and freshly ground black pepper

2 to 3 tablespoons canola oil

6 slices bacon, cut into 1/4-inch pieces

2 tablespoons unsalted butter

1 small onion, diced

4 garlic cloves, sliced

2 tablespoons all-purpose flour

1 750ml bottle red wine

4 carrots, peeled and cut into large dice

8 ounces mushrooms, cleaned and halved

8 ounces pearl or cremini onions

1 cup chicken stock, preferably homemade

2 tablespoons tomato paste

2 bay leaves

1 tablespoon chopped fresh thyme

1 teaspoon chopped fresh rosemary

1 cup frozen peas, thawed

1/4 cup chopped flat-leaf parsley

  1. Season the stew meat with salt and pepper.
  2. In a heavy Dutch oven or similar heavy pot, heat 2 tablespoons of oil over medium-high heat until shimmering. Sear the beef in batches until golden brown on all sides. Transfer the browned meat to a platter or bowl as it’s done.
  3. Add the bacon and the rest of the oil, if the pot seems dry, and sauté until the fat is rendered and the bacon is crispy. Add the butter and when it melts, add the onion and garlic and cook, stirring occasionally, for 4 to 5 minutes until the onions soften..
  4. Sprinkle the flour over the vegetables and cook for 1 minute longer, stirring constantly and scraping the bottom of the pan to remove any browned bits.
  5. Add the wine and cook over medium-high heat for about 5 minutes, stirring occasionally and scraping the bottom of the pot. Skim any foam that rises to the top of the pot.
  6. Add the carrots, mushrooms, pearl onions, stock, tomato paste, bay leaves, thyme and rosemary and the browned meat. Bring to a boil, skim any foam that rises to the top, and then reduce the heat and simmer for 50 to 60 minutes, or until the meat is tender. Adjust the heat as needed to maintain a gentle simmer.
  7. Finally, stir in the peas, parsley and season to taste with salt and pepper. Serve the stew hot.

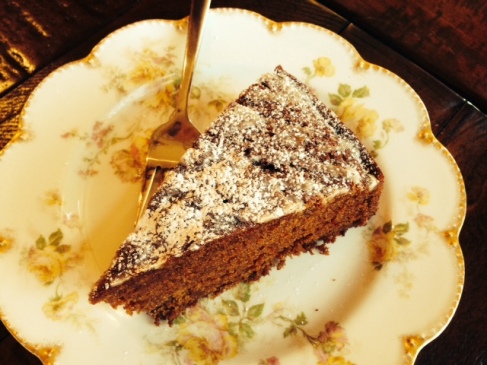
Ginger Cake to Warm Up These Cool Fall Nights

No one will be sorry to see this cake emerge from your kitchen. And its warm, spicy flavors are just right for this time of year when the winds blow cold and the dark comes early. Once you try it, you’ll want to make it over and over again — how about for Thanksgiving? Christmas? New Year’s? Valentine’s Day? You get the idea!

Image

Fresh Ginger Cake

This ordinary-looking cake is deceptive, packed as it is with powerful flavors, particularly the punch of fresh ginger. I bake it all year long, although I particularly like it in the fall when it fills the kitchen with warm, sensual aromas that say “autumn.” And in case you’re wondering about the difference between this and more typical gingerbread, this cake’s ginger and spice quotients are much higher.

Serves 10

6 ounces fresh ginger, peeled

1 cup granulated sugar

1 cup dark black-strap molasses

1 cup canola oil

2 teaspoons baking soda

21/2 cups all-purpose flour

1/2 teaspoon ground cinnamon

1/2 teaspoon ground cloves

2 large eggs, lightly beaten

About 1/2 teaspoon fresh lemon juice

1/4 cup confectioners’ sugar

Preheat the oven to 325°F. Grease a 9-inch round pan that is 3 inches deep and line it with a parchment paper circle cut to fit.

Cut the ginger into medium-size pieces and put in the bowl of a food processor. Add the granulated sugar and pulse until very smooth, like a paste. Mix together the molasses and canola oil.

In a saucepan, bring 1 cup of water to a boil over medium-high heat, add the baking soda, and when dissolved, stir in the molasses mixture.

Whisk together the flour, cinnamon, and cloves and then whisk into the molasses mixture until combined. Add the eggs and mix well.

Pour the batter into the prepared pan and bake for 60 to 65 minutes, or until a toothpick inserted in the middle of the cake comes out dry.

Meanwhile, in a small bowl, drizzle the lemon juice, a few drops at a time, over the confectioners’ sugar, whisking until the glaze is thick and smooth. Set the glaze aside until needed.

Allow the cake to cool in the pan for 10 to15 minutes and then turn out of the pan to cool completely on a wire rack. When cool, drizzle the glaze over the top of the cake and serve.

Time for Dinner! Are You Ready?

Image

If you’re like me, it can be a struggle to come up with a dinner menu night after night. Like so many of us with a family to feed and friends to welcome, I rely on the same recipes night after night, rotating tried-and-true dishes: grilled flank steak, quesadillas, tacos, and occasionally a roasted chicken.

No surprise there; I recently read that most of us cook chicken at least once a week. I am not knocking chicken. I love it, but how about something else now and then?

This is why I wrote The Dinnertime Survival Cookbook and why I post on this blog. To get us “unstuck” from the same old, same old. It’s time to change it up.

Scroll through the blog for tips, recipes, ideas, and more. Check out the DinnertimeSurvival Facebook page — and look for the book! I had so much fun putting it together, and my kids, husband, and friends enjoyed tasting the recipes I came up with – all thoroughly tested for reliability and overall appeal.

Together we will survive dinner! It’s fun, it’s delicious, and it’s a lot easier than you think.

And p.s.: I have lots of recipes for chicken in the book!

Butternut Soup Says Fall!

I love smooth, rich butternut squash soup. It says “fall is here” more eloquently than almost anything else. So, buy some squash (whole or already peeled and cut up) and make your family some luscious soup. Perfect for a meal or a snack. I even heat it up for breakfast!

Image

This soup is made with squash and pears. Talk about autumnal flavors! It’s one of my very favorites.


Butternut Squash and Pear Soup

When the weather turns crisp and cool in the autumn, you can find me at farmers’ markets demonstrating how to make this perfect fall soup, which is always a crowd-pleaser both at the markets and Aux Delices. Everyone is mad about butternut squash soup, and this one stands out — although you can make it with other fall squashes with tasty results. The pears enhance the squash’s natural sweetness and the dash of cinnamon brings it home. Just right for a chilly day. I often use squash that’s sold already peeled and cut to make life easier.

Serves 6 to 8

2 tablespoons unsalted butter

2 medium-size carrots, peeled and sliced

2 ribs celery, thinly sliced

1 small onion, sliced

11/4 pounds assorted fall squash, such as butternut, acorn, and Hubbard, peeled and cut into chunks

2 pears, cored and cut into large dice

6 cups chicken or vegetable stock

1/4 teaspoon ground cinnamon

1 teaspoon salt

Freshly ground black pepper

In a large soup pot, melt the butter over medium heat. When the butter begins to bubble, add the carrots, celery, and onions and cook for 10 to 12 minutes, or until softened without browning.

Add the squash and pears and stir to mix with the vegetables. Add the stock and cinnamon and bring to a boil over medium-high heat. Reduce the heat and simmer for 25 to 30 minutes or until the squash is tender when poked with a fork.

Transfer the soup, in batches, to a blender and process until smooth, or blend with an immersion blender. Return the puréed soup to the pot and season with salt and pepper. Reheat, if necessary, and serve hot.